samedi 17 août 2013
jeudi 15 août 2013
TeensyBoy official release
Fellow Chipmusicians,
EDIT : Jul 2014 Rev 2.2 is available you can download it here :
https://drive.google.com/folderview?id=0B0FLSOL-DH0VNW9KeTJKeFJWMVU&usp=drive_web
Changes : modified delay (500us) to send data to GB on MGB mode. Should help to fix notes drop
Today is the official release of the TeensyBoy.
What is a TeensyBoy ?
- It is simply a Arduinoboy on a Teensy 2.0.
What are the differences between Arduinoboy and TeensyBoy ?
- TeensyBoy is USB midi instead of classic Midi DIN connector, it doesn't need any driver just plus usb and it is recognized as a USB midi device
Is that all ?
- not exactly, Teensyboy is globally the same size as a Arduino Pro Mini ( so very small), more powerful than a Arduino Pro mini, As it is Midi USB it need less components.
What are the difference in usability ?
- None, all Arduinoboy modes as been ported to work on the teensy, so usage is exactly the same.
The only difference is that there is no Max/MSP patch to configure it because it can be reconfigured with Arduino IDE directly with the USB
How to build one ?
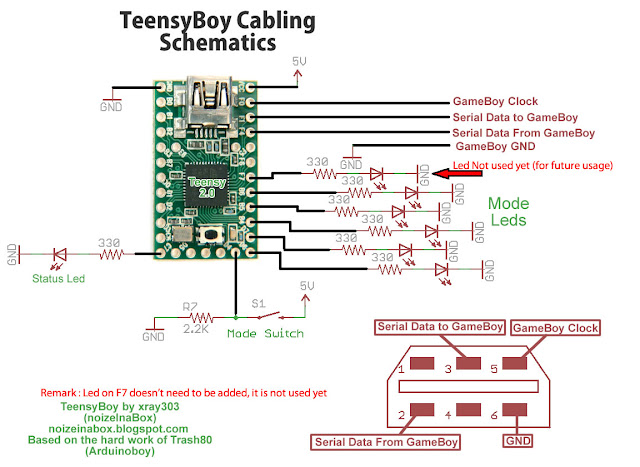
- Follow the schematics or cabling diagram, upload the code and that's it !
source code available at googlecode
EDIT : Jul 2014 Rev 2.2 is available you can download it here :
https://drive.google.com/folderview?id=0B0FLSOL-DH0VNW9KeTJKeFJWMVU&usp=drive_web
The original code is from Trash80 the creator of ArduinoBoy.
Cabling diagram :
Schematics :
Some pictures :
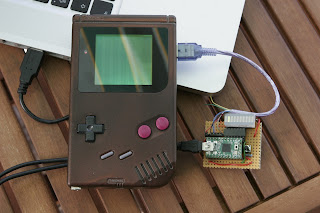
Teensyboy builded in the DMG (thanks to maniacfreakquency for the pic) :
So what's next ?
- Probably a small pcb for the shield maybe with smd leds and resistors.
Thanks to Trash80, maniacfreakquency, NEX, little-scale and all chipmusicians
EDIT : Jul 2014 Rev 2.2 is available you can download it here :
https://drive.google.com/folderview?id=0B0FLSOL-DH0VNW9KeTJKeFJWMVU&usp=drive_web
Changes : modified delay (500us) to send data to GB on MGB mode. Should help to fix notes drop
Today is the official release of the TeensyBoy.
What is a TeensyBoy ?
- It is simply a Arduinoboy on a Teensy 2.0.
What are the differences between Arduinoboy and TeensyBoy ?
- TeensyBoy is USB midi instead of classic Midi DIN connector, it doesn't need any driver just plus usb and it is recognized as a USB midi device
Is that all ?
- not exactly, Teensyboy is globally the same size as a Arduino Pro Mini ( so very small), more powerful than a Arduino Pro mini, As it is Midi USB it need less components.
What are the difference in usability ?
- None, all Arduinoboy modes as been ported to work on the teensy, so usage is exactly the same.
The only difference is that there is no Max/MSP patch to configure it because it can be reconfigured with Arduino IDE directly with the USB
How to build one ?
- Follow the schematics or cabling diagram, upload the code and that's it !
source code available at googlecode
EDIT : Jul 2014 Rev 2.2 is available you can download it here :
https://drive.google.com/folderview?id=0B0FLSOL-DH0VNW9KeTJKeFJWMVU&usp=drive_web
Arduinoboy mode available on Teensyboy :
1.LSDJ Slave : Working !
2. LSDJ Master: Working ! (tested with Ableton live 8)
3. LSDJ KEYBOARD mode: Working !
4. Nanoloop : Working ! (tested with nanoloop 1.6.3 demo)
5. mGB : Working !
6. LSDJ Midi Map : Working !
7. LSDJ Midi Out : Working !
2. LSDJ Master: Working ! (tested with Ableton live 8)
3. LSDJ KEYBOARD mode: Working !
4. Nanoloop : Working ! (tested with nanoloop 1.6.3 demo)
5. mGB : Working !
6. LSDJ Midi Map : Working !
7. LSDJ Midi Out : Working !
The original code is from Trash80 the creator of ArduinoBoy.
Cabling diagram :
Schematics :
Some pictures :
Teensyboy builded in the DMG (thanks to maniacfreakquency for the pic) :
So what's next ?
- Probably a small pcb for the shield maybe with smd leds and resistors.
Thanks to Trash80, maniacfreakquency, NEX, little-scale and all chipmusicians
mercredi 17 juillet 2013
TeensyBoy code release..
TeensyBoy code has been released for testing/debug purposes, please feel free to grab it at googlecode :
https://code.google.com/p/noizeinabox/
https://code.google.com/p/noizeinabox/
jeudi 6 décembre 2012
TeensyBoy
What is a TeensyBoy ?
EDIT :Due to some people request, the teensyboy source has been released on googlecode page
if you want to test/edit/enhance this project please download the source and let's rock.
TeensyBoy is just a ArduinoBoy code port for a Teensy uC.
What is ArduinoBoy? ArduinoBoy is a device using a Arduino (developped by Trash80) that enable MIDI capabilities for a old Nintendo GameBoy using special software like LSDJ, nanoloop, mGB.
Why porting ArduinoBoy on a Teensy ?
There is several reason but the most important one is that teensy is capable to emulate a Midi compliant device using midi, so TeensyBoy is using USB Midi instead of classic midi. So plug it in your USB port and it is automaticaly detected as a midi device.
The other reason are the price of a teensy is lower than a Arduino, it is much smaller, TeensyBoy will need less components that a ArduinoBoy (not optocoupler for example), using USBMidi library, code is less complicated, etc...
The code for Teensy is based on the Original ArduinoBoy created by Trash80, most of the code don't have changed.
The code is finished but still need tests and tweaking :
I don't know if it less responsive or if some thing is not working as expected, if someone want to do tests or compare with the ArduinoBoy please feel free to contact me.
Note : all sysex stuff has been removed because it need much more time to port it, and not sure if it is a lot used by chipmusicians. (sysex stuff seems to add config via maxmsp patch)
TeensyBoy schematics :
Teensy Cabling diagram :
Blurry Picture of the testing device :
Code will be available on my googlecode page once all mode been tested and working.
EDIT :Due to some people request, the teensyboy source has been released on googlecode page
if you want to test/edit/enhance this project please download the source and let's rock.
TeensyBoy is just a ArduinoBoy code port for a Teensy uC.
What is ArduinoBoy? ArduinoBoy is a device using a Arduino (developped by Trash80) that enable MIDI capabilities for a old Nintendo GameBoy using special software like LSDJ, nanoloop, mGB.
Why porting ArduinoBoy on a Teensy ?
There is several reason but the most important one is that teensy is capable to emulate a Midi compliant device using midi, so TeensyBoy is using USB Midi instead of classic midi. So plug it in your USB port and it is automaticaly detected as a midi device.
The other reason are the price of a teensy is lower than a Arduino, it is much smaller, TeensyBoy will need less components that a ArduinoBoy (not optocoupler for example), using USBMidi library, code is less complicated, etc...
The code for Teensy is based on the Original ArduinoBoy created by Trash80, most of the code don't have changed.
The code is finished but still need tests and tweaking :
- LSDJ slave mode : finshed and working
- LSDJ Master mode : finshed and working
- LSDJ keyboard mode : finished and working
- Nanoloop mode : finished but cannot test it (don't own nanoloop)
- mGB mode : finished and sems working need further tests.
- LSDJ map mode : not tested yet
- LSDJ Midiout : not tested yet
I don't know if it less responsive or if some thing is not working as expected, if someone want to do tests or compare with the ArduinoBoy please feel free to contact me.
Note : all sysex stuff has been removed because it need much more time to port it, and not sure if it is a lot used by chipmusicians. (sysex stuff seems to add config via maxmsp patch)
TeensyBoy schematics :
Teensy Cabling diagram :
Blurry Picture of the testing device :
Code will be available on my googlecode page once all mode been tested and working.
mardi 10 juillet 2012
noizeInaBox temporary "shop" is available
I will finally create a small online shop for few devices i've created.
So currently there is no official online shop but i created a page with the things i sell.
You can find the shop page in the "tab" between Acceuil and Bookmark ..
So currently there is no official online shop but i created a page with the things i sell.
You can find the shop page in the "tab" between Acceuil and Bookmark ..
lundi 9 juillet 2012
noizeInaBox DMG deep bass PCB mount
Currently working on my Deep Bass DMG PCB mount.
It will be a full headphone PCB replacement with 2 new 3.5 mm audio jack. so you won't need to desolder the original DMG headphone jack.
For sound output it will use high quality OxiCaps.
It is impossible to find a 3.5mm jack with the same size and feature as the original gameboy one. (independent normally connected switch), i found a suitable one but with a normally open switch. so i needed to add a 5V cable to it to be able to do the Headphone/speaker switch.
As the prosound jack is the same i've a normally open switch left, which i don't know how to use it for.
i was thinking of some start/select illumination when you plug the prosound jack in.
globally it is a switch that close when you plug the prosound jack in. so it can be used for anything.
if you have a good idea, please let me know.
vendredi 6 juillet 2012
noizeInaBox Selectable GB Clock working fine.
I soldered and tested the noizeInaBox Selectable GB Clock and it's working perfectly.
By connecting VCC or GND to the A and B pins, you can select the desired frequency .
Some pictures and Scope screenshots
compare the size with a GB battery.
if you look carfeully you can see a short between 2 pins of the IC, this is normal, i forgot a trace on the PCB during PCB creation .. huuuu ..
There is also 3 pad on the board, it is to set a default "value" the the pin B. For example make a short between pad B and GND then add a SPDT swith on GND, VCC and Pin A, will make a 4Mhz/2Mhz selectable oscillator for your GB (if you don't want lower selectable freq).
Some scope trace:
You can see that the frquency is not correct, because there is some drift in the freq. due to the way a tested it, the circuit was plugged on a breadboard then from breadboard to the GB.
also, the GB was powered by a very crappy switching power supply.

The original GB crystal.
If someone is interested i've a few to sell, with component already soldered. just drop me a email.
By connecting VCC or GND to the A and B pins, you can select the desired frequency .
Some pictures and Scope screenshots
compare the size with a GB battery.
if you look carfeully you can see a short between 2 pins of the IC, this is normal, i forgot a trace on the PCB during PCB creation .. huuuu ..
There is also 3 pad on the board, it is to set a default "value" the the pin B. For example make a short between pad B and GND then add a SPDT swith on GND, VCC and Pin A, will make a 4Mhz/2Mhz selectable oscillator for your GB (if you don't want lower selectable freq).
Some scope trace:
You can see that the frquency is not correct, because there is some drift in the freq. due to the way a tested it, the circuit was plugged on a breadboard then from breadboard to the GB.
also, the GB was powered by a very crappy switching power supply.

The original GB crystal.
If someone is interested i've a few to sell, with component already soldered. just drop me a email.
Inscription à :
Articles (Atom)


